DHTMX 간트차트 구현기
진행하는 프로젝트에서 간트차트로 일정관리하는 기능 개발을 담당하게 되어 여러 라이브러리를 비교하던 중
- UI가 깔끔하고
- React를 지원하며
- 문서화가 잘 되어있는
DHTMLX(공식문서) 라이브러리를 사용하기로 했다.
주요 기능들과 커스텀한 내용을 소개해보자면
1️⃣ 커스텀 스크롤
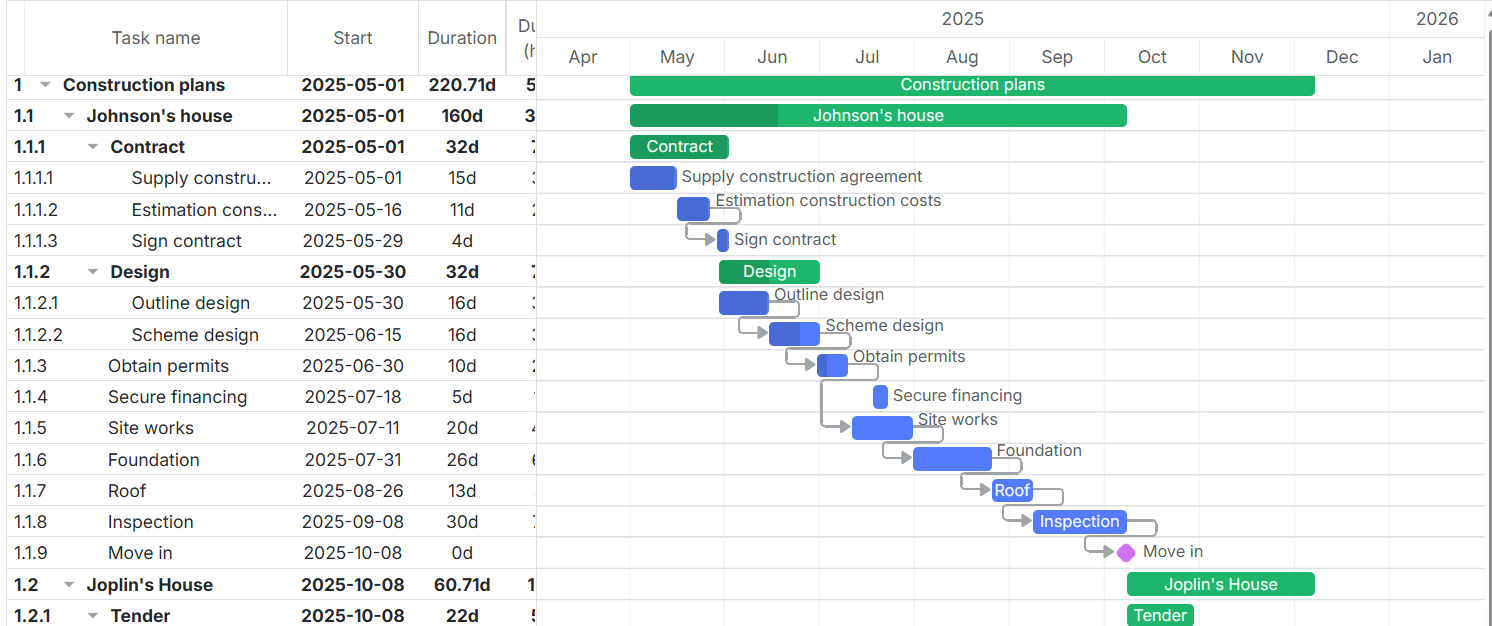
원래 기본 스크롤은 왼쪽 그리드 영역은 고정이고 오른쪽 차트 영역을 스크롤하는 것이었다. 하지만 위와같이 그리드 영역이 좁아질 경우 데이터를 제대로 보여주지 못하는 문제가 있어 그리드 영역과 차트 영역 각각에 스크롤을 설정해 컨트롤할 수 있게 개선이 필요했다.
          gantt.config.layout = {
                css: "gantt_container",
                cols: [
                    {
                        width: 400,
                        min_width: 400,
                        rows: [
                            {view: "grid", scrollable: true, scrollX: "gridScrollHor", scrollY: "scrollVer"},
                            {view: "scrollbar", id: "gridScrollHor", height: 20},
                        ],
                    },
                    {
                        rows: [
                            {view: "timeline", scrollable: true, scrollX: "timelineScrollHor", scrollY: "scrollVer", width: 1},
                            {view: "scrollbar", scroll: "x", id: "timelineScrollHor", height: 20},
                        ],
                    },
                    {view: "scrollbar", id: "scrollVer"},
                ],
            };
왼쪽 그리드 영역은 width를 400px로 고정하고 그 외의 영역은 timeline이 차지하도록 width : 1을 설정했다.

2️⃣ locale ko로 수정
gantt.locale = {
                date: {
                    month_full: ["1월", "2월", "3월", "4월", "5월", "6월", "7월", "8월", "9월", "10월", "11월", "12월"],
                    month_short: ["1월", "2월", "3월", "4월", "5월", "6월", "7월", "8월", "9월", "10월", "11월", "12월"],
                    day_full: ["일요일", "월요일", "화요일", "수요일", "목요일", "금요일", "토요일"],
                    day_short: ["일", "월", "화", "수", "목", "금", "토"],
                },
                labels: {
                    new_task: "새일정",
                    dhx_cal_today_button: "오늘",
                    day_tab: "일",
                    week_tab: "주",
                    month_tab: "월",
 ...
한국어로 date 표시 및 ui 요소(버튼명, 폼 필드명 등)에 표시되는 라벨명 수정
++ 라벨 추가는
gantt.locale.labels.section_modification_reason = "일정 변경 사유";3️⃣ date 순서 변경
기본 date format은 dd-mm-yy 순

✔️ yy-mm-dd순으로 변경
gantt.config.date_format = "%Y-%m-%d %H:%i";4️⃣ onBeforeLightbox
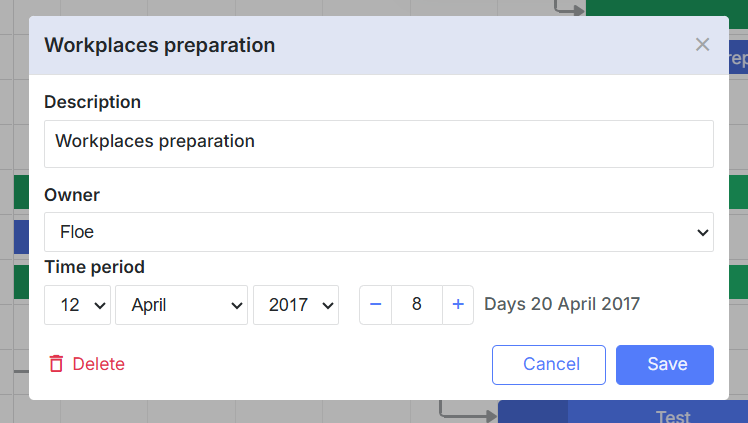
일정 등록/수정/삭제를 위한 모달을 lightbox라고 하는데 이 모달이 열리기전에 하고자 하는 작업을 설정할때 사용하는 함수이다.
gantt.attachEvent("onBeforeLightbox", function(id) {
    const task = gantt.getTask(id);
    task.my_template = `<span id='title1'>Holders: </span>${task.users}
    <span id='title2'>Progress: </span>${task.progress*100}%`;
    return true;
});
나는 여기에 따로 외부에서 만든 셀렉트 박스 컴포넌트를 주입하기 위해
gantt.config.buttons_right = ["dhx_delete_btn"];
gantt.config.lightbox.sections = [
                                {
                                    name: "food",
                                    height: 35,
                                    map_to: "food",
                                    type: "textarea",
                                },
                                {
                                    name: "drink",
                                    height: 20,
                                    map_to: "drink",
                                    type: "custom",
                                },
lightbox.sections의 type을 custom으로 설정하고
 const addMuntoContainer: LightboxControl = {
                render: function (sns: any) {
                    return `<div class='custom_muntno_container' style="width: 100%;"></div>`;
                },

                set_value: function (node: HTMLElement, value: string, task: any, section: any) {
                    ...
                },

                get_value: function (node: HTMLElement, task: any, section: any) {
                    return task.muntno || "";
                },
            };

  gantt.form_blocks["custom"] = addMuntoContainer;
form_blocks의 type이 custom인 영역에 div태그를 추가해주었다.
5️⃣ onLightbox
모달이 열렸을 때 실행하는 함수로 onBeforeLightbox에서 생성한 div 태그를 찾아 외부에서 만든 컴포넌트를 렌더링 해주었다.
            gantt.attachEvent("onLightbox", function (id: number) {
                const task = gantt.getTask(id);

                const lightbox = document.querySelector(".custom_muntno_container");

                if (lightbox) {
                    if (rootInstance) {
                        rootInstance.unmount();
                    }

                    rootInstance = createRoot(lightbox);
                    rootInstance.render(
                        <CutomComponents
                        />,
                    );
                }
            });
6️⃣ onLightboxSave
모달에서 save 버튼 클릭 시 실행되는 함수로 api 연동이나 validation check 로직을 정의했다.
gantt.attachEvent("onLightboxSave", function(id, task, is_new){
    //any custom logic here
    return true;
})
7️⃣ lightbox header name 설정
 gantt.templates.lightbox_header = function (start: Date, end: Date, task: GanttTask) {
                let headerName;
                if (currentLevelRef.current === 1) {
                    if (task.text !== "새 일감") {
                        headerName = "일감 수정";
                    } else {
                        headerName = "일감 등록";
                    }
                }
                return headerName;
            };
8️⃣ timeline 영역 헤더 커스텀
  // timeline 헤더 설정
            gantt.config.scales = [
                {
                    unit: "day",
                    step: 1,
                    format: function (date: Date) {
                        const monthNames = ["01", "02", "03", "04", "05", "06", "07", "08", "09", "10", "11", "12"];
                        const day = date.getDate();
                        const month = date.getMonth();
                        const dayString = day < 10 ? `0${day}` : day;
                        return `${monthNames[month]}.${dayString}`;
                    },
                },
            ];
기본 timeline 헤더

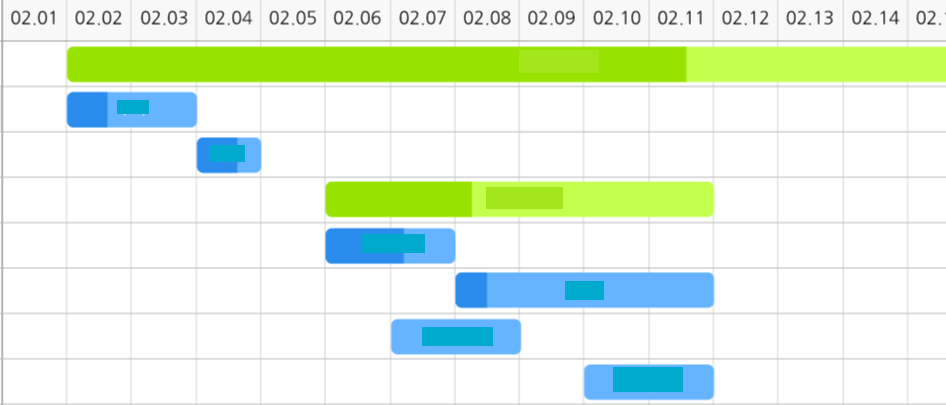
커스텀한 timeline 헤더

9️⃣ 레벨에 따라 일감을 스타일링하고 싶을 때
 gantt.templates.task_class = function (start: Date, end: Date, task: GanttTask) {
                // 최상위 일감
                if (!task.parent) {
                    return "highlight-parent-task";
                }

                // 하위 일감
                const parentTask = gantt.getTask(task.parent);
                if (parentTask) {
                    return "highlight-child-task";
                }
                return "";
            };
클래스를 다르게 주어
부모일감과 하위일감의 색을 커스텀할 수 있다.
🔟 onLightboxDelete
lightbox에서 삭제 버튼을 클릭했을때 실행되는 함수이다. true를 return하면 정상정으로 삭제를 진행, false를 return하면 삭제가 진행되지 않는다.
gantt.attachEvent("onLightboxDelete", function(id){
    const task = gantt.getTask(id);
    if (task.duration > 60){
        alert("The duration is too long. Please, try again");
        return false;
    }
    return true;
})
1️⃣1️⃣ onAfterTaskUpdate
일감이 수정된 후 실행되는 함수
gantt.attachEvent("onAfterTaskUpdate", function(id,task){
    //any custom logic here
});
1️⃣2️⃣ 드래그 관련 함수
- onTaskDrag
: 드래그할 때 실행되는 함수
gantt.attachEvent("onTaskDrag", function(id, mode, task, original){
    //any custom logic here
});- onAfterTaskDrag
: 드래그 완료 후 실행되는 함수
gantt.attachEvent("onAfterTaskDrag", function(id, mode, e){
    //any custom logic here
});- onBeforeTaskDrag
: autoScehduling을 직접 구현하다보니 최상위 일감의 드래그를 막는 로직이 추가로 필요했다.(최상위 일감은 하위 일감들의 일정에 따라 계산되는 일정)
일정을 드래그하여 조정하기 전 최상위 일감인지 먼저 판단 후 최상위면 false를 return하여 드래그를 방지했다.
    gantt.attachEvent("onBeforeTaskDrag", function (id: string, mode: string, e: MouseEvent) {
                const task = gantt.getTask(id);

                // 부모 Task 드래그 방지
                if (task.type === "project" || gantt.hasChild(id)) {
                    return false;
                }

                return true;
            });
➕ 이 외에도 다양한 커스텀 가능한 이벤트들이 정의되어 있고 설명과 예시도 문서화로 잘 구성되어 있어서 다음에도 간트 차트를 구현한다면 dhtmlx 라이브러리를 사용할 것 같다.
🧷 이벤트 문서